How to Tie a Tie Step by Step: Master the Four-in-Hand Knot

We have all been there — standing in front of a mirror, tie in hand, wedding or interview in an hour, watching the same tutorial for the fifth time. Learning how to tie a tie step by step feels intimidating until suddenly, it clicks. And I promise: it will click. The Four-in-Hand knot I am about to teach you is the one knot every person should know — simple, versatile, and appropriate for nearly every occasion.
Take a breath. Grab your tie. Stand in front of that mirror. By the end of this guide, you will have a crisp, confident knot — and you will wonder why it ever seemed hard.
Before You Start: Tie Basics
A quick orientation so nothing confuses you:
- The wide blade is the fat end of the tie — this is the active end you will be wrapping.
- The narrow blade is the skinny end — it mostly stays put behind the wide blade.
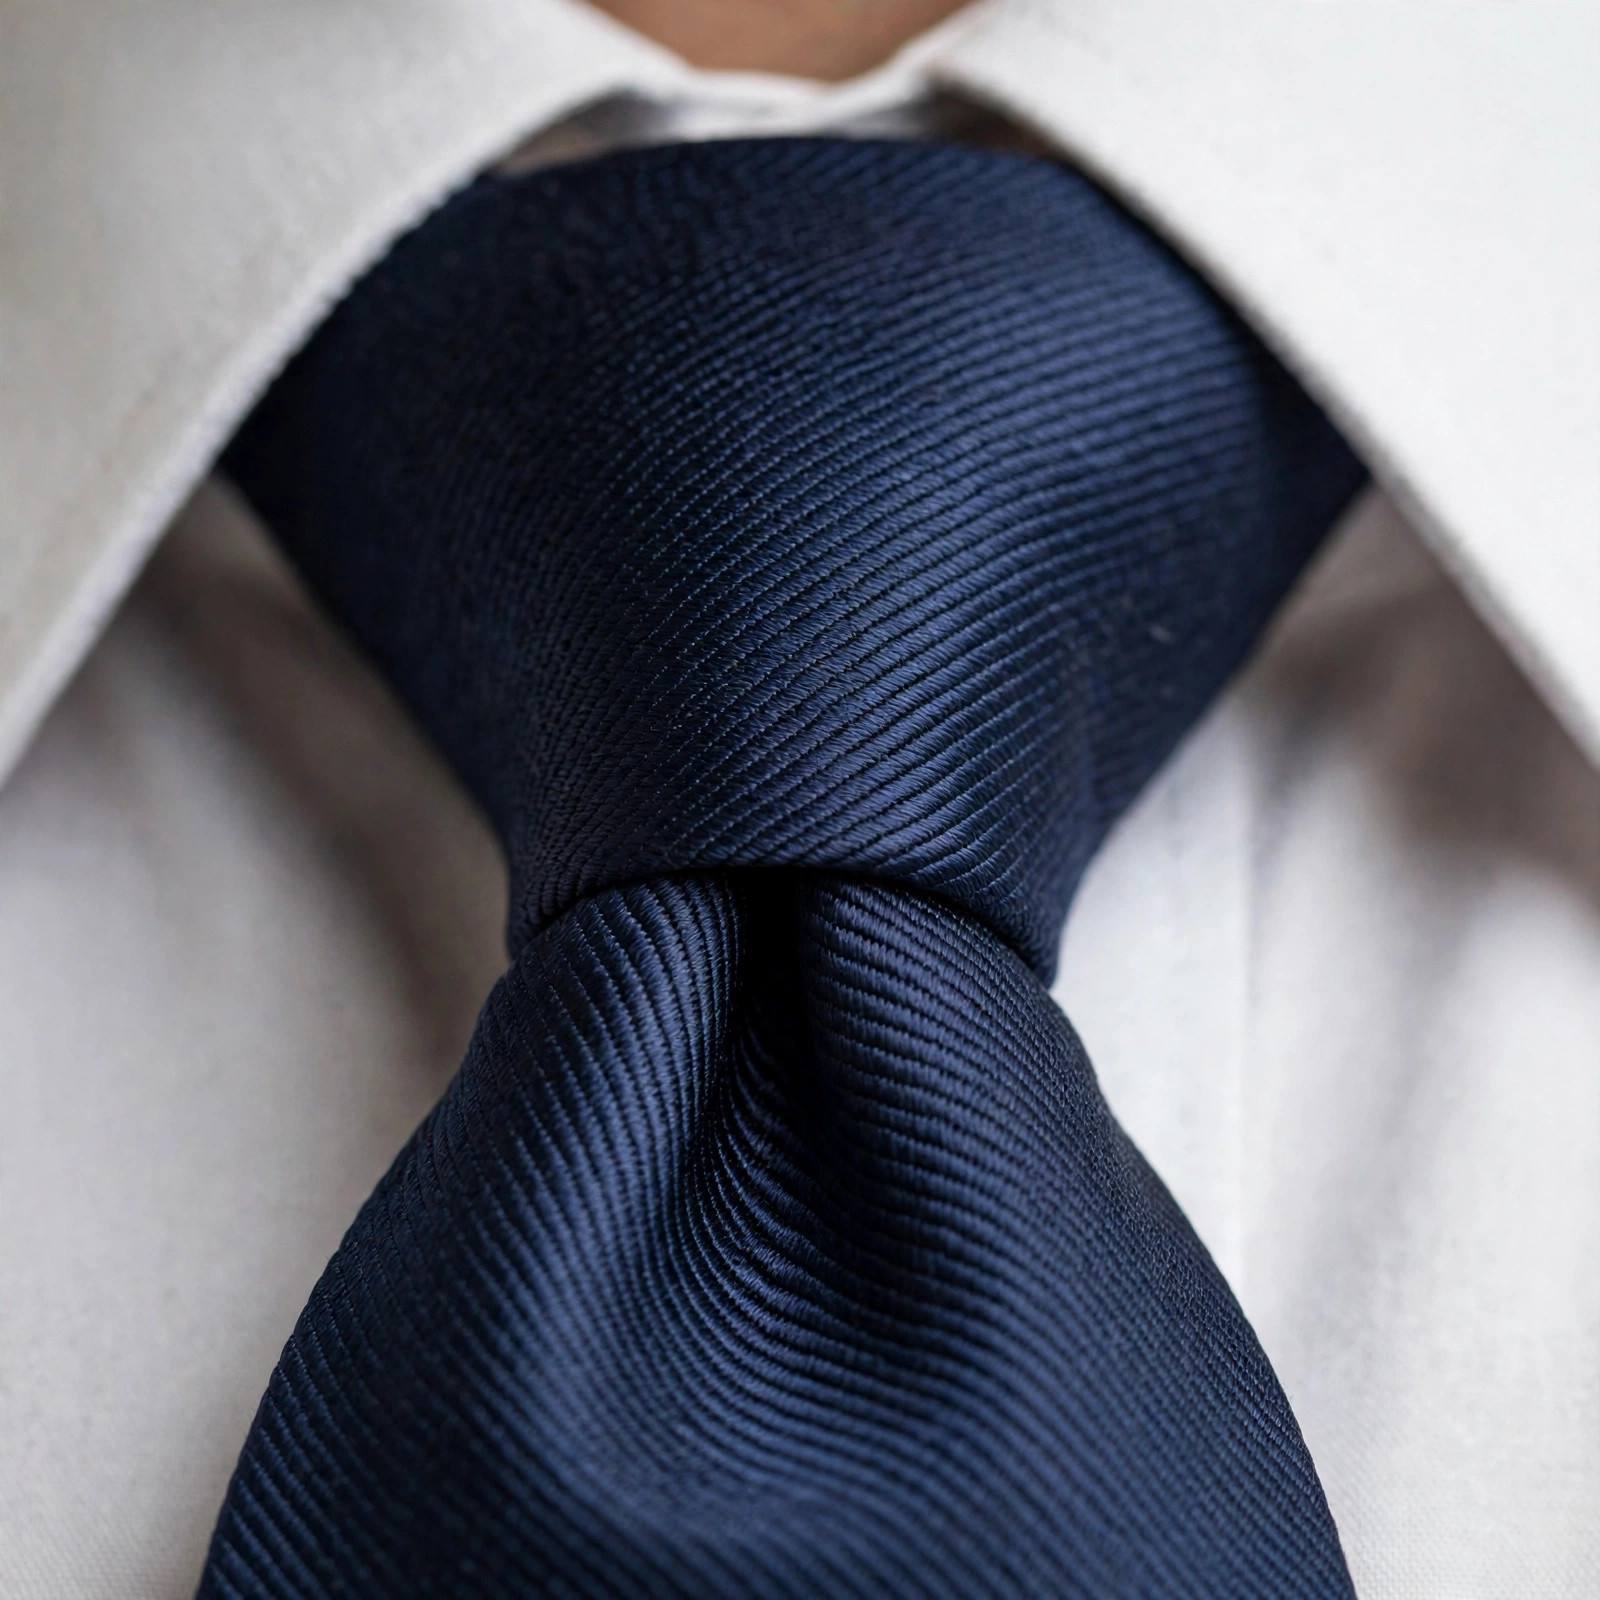
- The dimple is that little crease just below the knot — the mark of a well-tied tie.
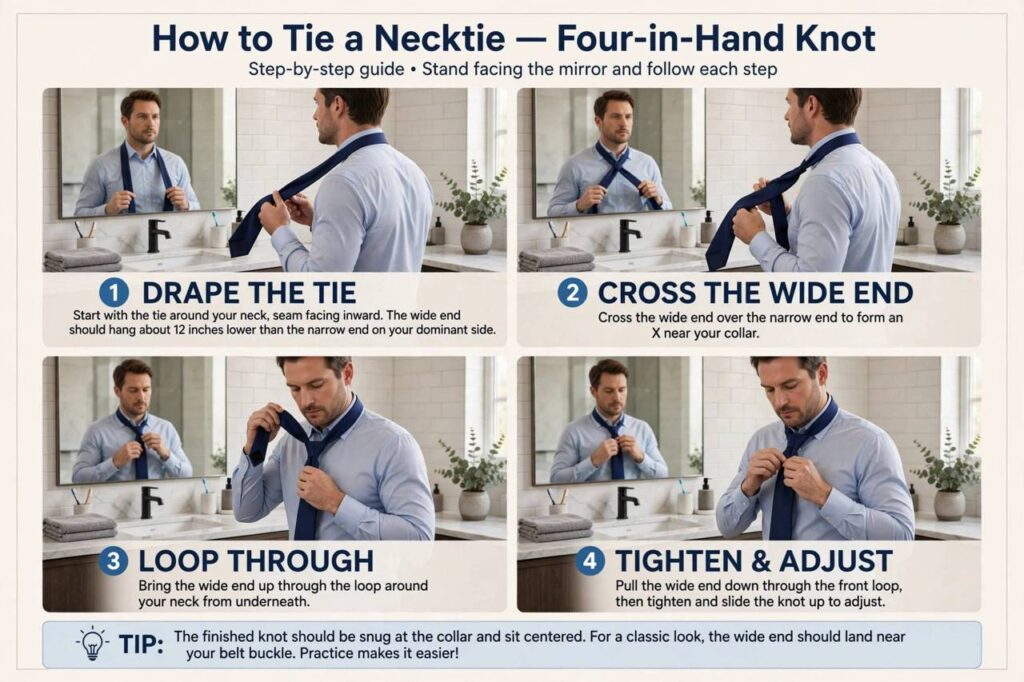
- Stand with your collar up and the top button fastened. Drape the tie around your neck with the wide blade on your dominant side (right side if you are right-handed).
- The wide blade should hang roughly twice as low as the narrow blade to start — about 12 inches lower. You will adjust with practice.
How to Tie a Tie Step by Step: The Four-in-Hand Knot
The Four-in-Hand is the king of knots: slightly asymmetrical, effortlessly elegant, and it works with almost every collar type and tie fabric. Follow along slowly.
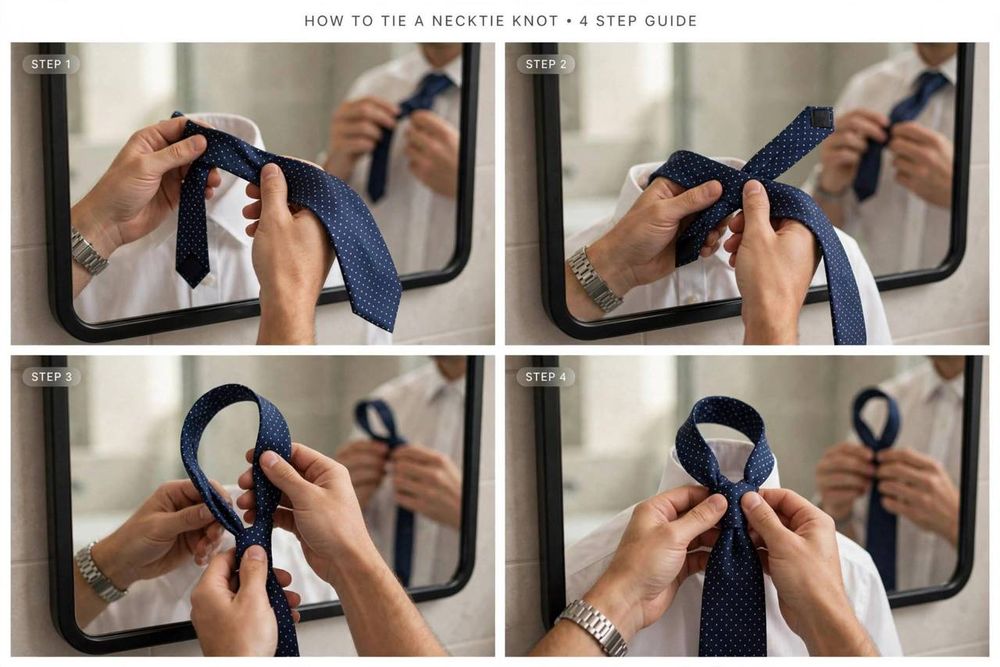
Step 1: Cross the wide blade over
Starting with the wide blade hanging longer on your right, cross it over the narrow blade to the left, forming an X just below your chin. Hold the intersection with your left hand — this is your anchor point for everything that follows.
Step 2: Bring it behind
Take the wide blade and bring it behind the narrow blade, moving right to left. You are wrapping around the narrow blade now. Keep the wrap snug but not strangling-tight — you will adjust tension at the end.
Step 3: Bring it across the front
Bring the wide blade back across the front, left to right. You have now made one full loop around the narrow blade. You should see a horizontal band forming — this will become the knot.
Step 4: Up through the neck loop
Now bring the wide blade up through the neck loop — the V-shaped opening between your collar and the wraps you just made. Pull it up from behind so the tip emerges pointing toward the ceiling.
Step 5: Down through the front loop
Here is the magic moment: feed the wide blade down through the horizontal loop you created in Step 3 (the front-facing loop). The tip should slide down behind the knot-to-be and emerge pointing toward the floor.
Step 6: Tighten and shape
Hold the narrow blade with one hand and slide the knot up toward your collar with the other, using the wide blade to adjust. As the knot tightens, pinch the fabric just below the knot with your thumb and forefinger to form the dimple — that handsome little crease. Slide the knot snug against your collar, centering it in the V of your collar.
Getting the Length Right
The golden rule: the tip of the wide blade should just touch your belt buckle (or where your belt would be). Too short looks stubby; too long looks sloppy. If your first attempt lands wrong, note which way and adjust your starting position — start the wide blade higher if the finished tie is too long, lower if too short. After three or four tries, your hands will learn your correct starting point automatically.
The narrow blade should be slightly shorter than the wide blade and tucked behind it. Most dress shirts have a small loop (the “keeper loop”) on the back of the wide blade — thread the narrow blade through it to keep everything tidy.
The Dimple: Your Secret Weapon
That small crease beneath the knot separates amateur from polished. Here is how to nail it every time:
- As you tighten the knot in Step 6, pinch the tie’s fabric directly below the knot between thumb and forefinger.
- Push slightly inward while sliding the knot up — the fabric will fold into a natural dimple.
- Silk and smooth fabrics dimple easily; very thick or stiff fabrics resist it. Do not force a dimple on a knit or heavy wool tie — a clean flat finish looks fine there.
- If the dimple collapses, your knot is probably too loose. Snug it up — a firm knot holds its shape all day.
Common Mistakes and Quick Fixes
- Knot too small or too large: usually a tension issue. Re-tie, keeping wraps snug and even from the start.
- Knot sits crooked: center it before the final tightening — once snug against the collar, it is hard to shift.
- Tie too short: start with the wide blade hanging lower next time. Tall people often need extra-long ties — they exist, and they are worth it.
- Wrinkled blade: you pulled unevenly. Loosen completely and re-tie rather than fighting wrinkles.
- Knot loosens during the day: the initial wraps were too loose. A properly snug Four-in-Hand holds for 12+ hours.
- Storing ties wrong: always untie fully (reverse the steps) rather than loosening and slipping off — slipping stretches the fabric permanently. Roll ties for storage instead of hanging.
When to Use Other Knots
The Four-in-Hand handles 90% of life. But for completeness:
- Half-Windsor: a slightly larger, more symmetrical knot. Good for job interviews and formal events, especially with spread collars.
- Full Windsor: the big, triangular, formal knot. Best for wide spread collars and very formal occasions — it uses more tie length, so it suits taller people.
- Pratt (Shelby) knot: neat and symmetrical, medium size, and — uniquely — tied inside-out to start. A nice middle ground.
Learn the Four-in-Hand cold first. Add the Half-Windsor when you want variety. You may never need the Full Windsor, and that is perfectly fine.

Choosing the Right Tie for the Occasion
- Job interviews: solid colors or subtle patterns in navy, burgundy, or dark green. Conservative and confident.
- Weddings: match the formality — silk in classic colors for formal weddings; knit or textured ties for relaxed ones.
- Business daily: rep stripes, small dots, and subtle geometrics in versatile colors.
- Funerals: solid black or very dark, understated. Respect over style.
Width matters too: match your tie width roughly to your jacket lapel width for a harmonious look. Standard ties run about 3 to 3.25 inches at the widest point; slimmer builds suit slightly narrower ties.
Practice Plan: Knot Confidence in a Week
Here is the truth about tie-tying: it is pure muscle memory. Ten focused minutes a day for a week, and you will tie a Four-in-Hand without thinking. Practice in front of a mirror the first few days, then try it by feel. Teach someone else once you have it — teaching cements the skill permanently. And keep a tie in your desk drawer or car; the day you need one unexpectedly, you will be the calmest person in the room.
Tying a Tie on Someone Else
Sooner or later, someone – a nervous groom, a kid at prom, a friend before a big interview – will ask you to tie theirs. It is the same Four-in-Hand, but mirrored: stand facing them, drape the tie around their neck, and tie it as if it were your own reflection. The only tricky part is left-right reversal, so go slowly and narrate what you are doing – it teaches them at the same time. Stand close enough to see the knot clearly, keep your movements deliberate, and finish by adjusting the knot while they hold a mirror. Being the person who can tie someone else’s tie is a quiet superpower; wield it generously.
Tie Care: Making Them Last for Years
A good tie can last decades with basic care. Always untie completely after wearing – reversing your morning steps rather than loosening the knot and slipping it off, which permanently stretches the fabric and ruins the shape. Store ties rolled loosely (never folded, which creates creases) in a drawer or dedicated tie rack, away from direct sunlight that fades colors unevenly.
For wrinkles, hang the tie in a steamy bathroom – the steam relaxes most creases without an iron, which you should never press directly onto a tie. For stains, blot immediately (never rub) and take silk ties to a professional cleaner; water spots on silk are notoriously unforgiving of home remedies. Rotate your ties, giving each at least a day or two of rest between wearings so the fabric recovers its shape. Treat them well and they will return the favor every time you knot them.
FAQ
What is the easiest tie knot for beginners?
The Four-in-Hand. It requires the fewest steps, works with nearly all collar types and tie fabrics, and looks appropriate for almost every occasion. Master it first before learning larger knots like the Windsor.
How long should a tie be?
The tip of the wide blade should just reach your belt buckle. Standard ties fit most people between 5’8″ and 6’1″; if you are taller or shorter, look for extra-long or short sizes rather than struggling with a standard tie.
Why does my tie knot look lopsided?
Usually uneven tension in the wraps or the knot was not centered before tightening. Keep each wrap snug and even, center the knot in your collar’s V as you slide it up, and pinch the dimple deliberately. A little asymmetry is actually characteristic of the Four-in-Hand — perfectly symmetrical is not the goal.
Should the narrow end of the tie show?
Ideally no — the narrow blade should hide behind the wide blade, secured through the keeper loop on the back of the wide blade. If the narrow end peeks out, your starting proportions were off; begin with the wide blade hanging lower.
How do I keep my tie from wrinkling?
Always fully untie after wearing (never slip it off loosened), roll it loosely for storage rather than hanging it folded, and let it rest a day or two between wearings. For travel, roll the tie and place it inside a shoe or packing cube to hold its shape.