Most Stable Diffusion users spend all their energy on the main prompt and treat the negative prompt box like an afterthought — a place to paste someone else’s magic incantation and hope for the best. I did exactly that for my first month. Then I actually learned what the negative prompt does, and my images improved more in a week than they had in the previous four. The negative prompt isn’t a superstition. It’s half the steering wheel.
This guide explains what negative prompts actually do under the hood, how to write good ones, the universal starter list that works for almost everything, and the situations where negative prompts backfire. If you need the bigger picture first, my overview of how Stable Diffusion works sets the stage.
Table of Contents
- What a Negative Prompt Actually Is
- How It Works: Guidance Away From Bad Regions
- The Universal Starter Negative Prompt
- Anatomy-Specific Negatives: Hands, Faces, Bodies
- Style and Artifact Negatives
- When Negative Prompts Backfire
- Negative Prompts vs Prompt Weighting
- Building Your Own Negative Prompt Library
- Negative Embeddings: The Upgrade Path
- Frequently Asked Questions
What a Negative Prompt Actually Is
Every Stable Diffusion interface has two text boxes: the prompt (what you want) and the negative prompt (what you don’t want). During generation, the model is guided toward the prompt and away from the negative prompt, simultaneously, at every denoising step.
Think of it this way: your main prompt says “go toward the meadow,” and your negative prompt says “definitely not toward the swamp.” The model needs both because its learned image-space contains plenty of swamps — blurry photos, watermarked stock images, malformed anatomy — mixed in with the meadows. Without the negative signal, it can drift into bad regions that happen to partially match your words.
The key insight: the negative prompt isn’t a filter applied after generation. It’s active guidance during generation, shaping the image as it forms. That’s why it’s so powerful — and why getting it wrong can actively harm results.
How It Works: Guidance Away From Bad Regions
Technically, this uses the same mechanism as regular prompting (classifier-free guidance), just pointed in the opposite direction. At each denoising step, the model computes two predictions: one conditioned on your prompt, one conditioned on your negative prompt. It then moves toward the first and away from the second.
This is why negative prompts work best for things the model genuinely knows as concepts. “Blurry” works because the model learned what blurry looks like from blurry training images. “Watermark” works because it saw watermarked stock photos. You’re not teaching it new concepts — you’re pointing at regions of its existing knowledge and saying “not there.”
It also explains the main limitation: the negative prompt can’t remove something the model doesn’t understand as a separable concept. Negating complex compositional ideas (“don’t put the cat on the left”) works poorly, because spatial arrangement isn’t a clean concept to steer away from. Negate qualities and artifacts, not compositions.
The Universal Starter Negative Prompt
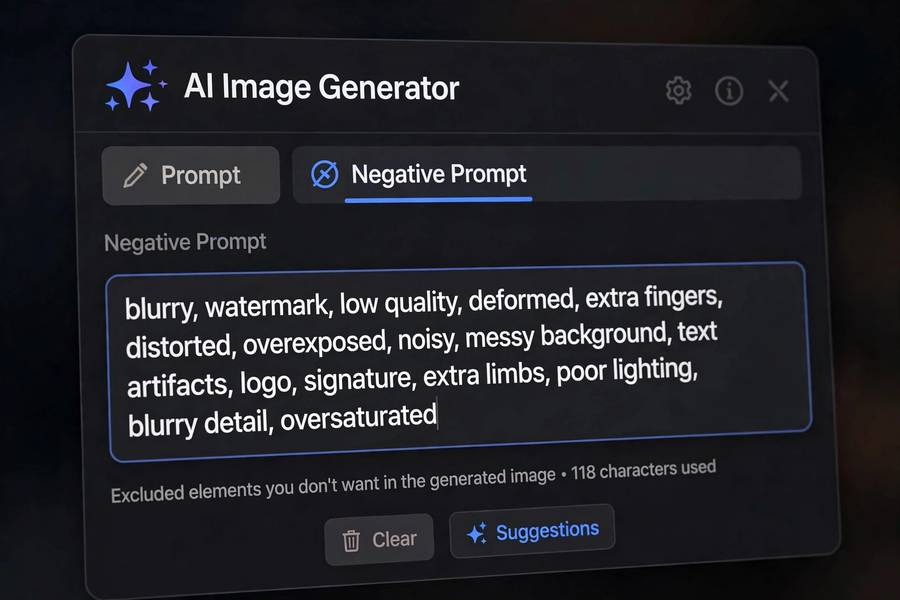
Here’s the workhorse list that improves nearly every image. Memorize it, then customize:
“blurry, low-res, distorted, deformed, watermark, text, logo, oversaturated, grainy, out of frame”
What each term earns its place fighting:
- blurry, low-res, grainy — pushes toward the model’s sharp, high-quality patterns
- distorted, deformed — the general-purpose anatomy guard
- watermark, text, logo — kills the stock-photo artifacts the model learned from captioned web images
- oversaturated — prevents the garish color drift that cheap prompts produce
- out of frame — reduces cropped-off subjects and awkward edges
This fits in one line and covers 80% of common failures. Everything below is specialization.
Anatomy-Specific Negatives: Hands, Faces, Bodies
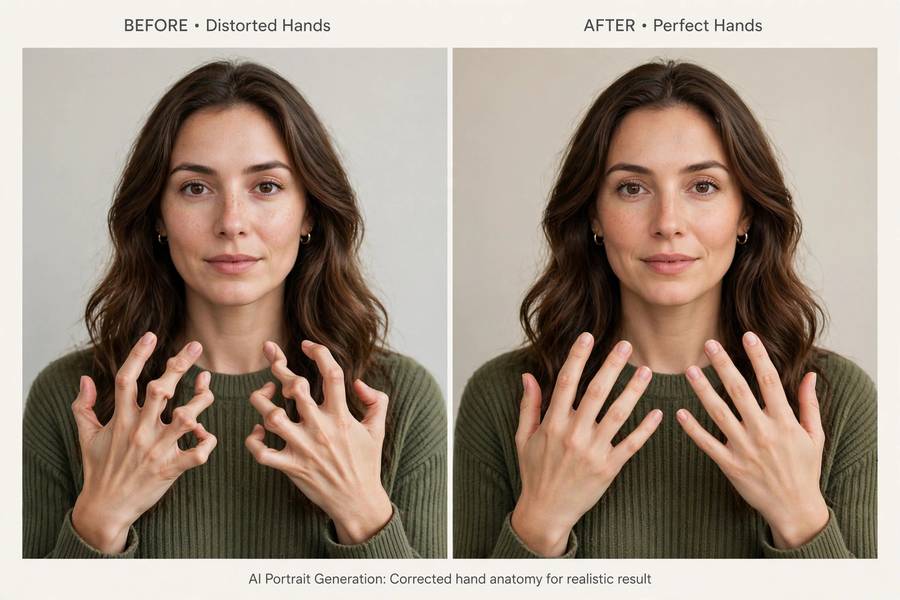
AI anatomy failures are the most visible quality killer, so they get their own arsenal. For any image with people:
“extra limbs, extra fingers, mutated hands, poorly drawn hands, fused fingers, too many fingers, malformed hands, disfigured, missing arms, missing legs”
A few notes from experience:
- Hands deserve the most terms. They’re the hardest thing for the model and the first thing viewers notice. Don’t be shy — the hand-specific list above is standard, not excessive.
- “Deformed” and “disfigured” are broad guards that catch general body weirdness beyond hands.
- Face-specific: “deformed face, asymmetrical face, crossed eyes” for close portraits.
- Diminishing returns are real. Ten anatomy terms beat three; thirty don’t beat ten. Past a point you’re just spending prompt attention.
One more thing: newer models (SDXL especially) need less of this. The anatomy got better at the model level. But for SD 1.5 portraits, this list is close to mandatory — the difference between using it and skipping it is genuinely dramatic.
Style and Artifact Negatives
Beyond anatomy, negative prompts control aesthetics and technical artifacts:
Photography artifacts: “lens flare, motion blur, chromatic aberration, jpeg artifacts, noise” — for clean photographic looks.
Illustration artifacts: “sketch lines, unfinished, rough draft” — when you want polished final art, not process work.
Style contamination: “cartoon, 3d render, plastic” when you want photorealism — or the reverse. The model’s styles bleed into each other; negatives keep the lanes clean.
Text artifacts: “words, letters, signage, captions” — the model loves hallucinating pseudo-text into images. If your scene might contain anything text-like (books, signs, screens, shirts), negate text explicitly.
Frame artifacts: “border, frame, vignette” — kills the tendency to render images as if inside a picture frame.
The pattern: negate whatever failure mode your current image type is prone to. Portraits get anatomy terms; scenes get text terms; photorealism gets style-contamination terms.
When Negative Prompts Backfire
Negative prompts aren’t free. Three ways they hurt:
1. Negating things you actually want. The classic: negating “dark” because you had one gloomy image, then wondering why your noir detective scene looks washed out. Negatives are global — they apply to the whole image. Be specific, and remove terms that conflict with your current goal.
2. Over-negation flattening. A massive negative prompt full of style terms (“no cartoon, no painting, no 3d, no sketch, no anime…”) can over-constrain the model into bland, lifeless output. You’ve fenced off so much territory that nothing interesting remains. If images feel sterile, trim the negatives first.
3. The paradox of negation. Telling the model “no red” can increase red, because the concept of red is now active in its processing. This is the famous “don’t think of a pink elephant” problem, and it genuinely applies. For colors and prominent objects, it’s often better to positively specify what you want (“blue car”) than to negate what you don’t (“no red car”).
The rule of thumb: negatives for quality and artifacts (blurry, watermark, deformed) — almost always safe. Negatives for content and style — use carefully, and prefer positive specification.
Negative Prompts vs Prompt Weighting
Beginners sometimes confuse negative prompts with prompt weighting (emphasis syntax like parentheses). They’re different tools:
- Negative prompt = “steer away from this concept entirely”
- Weighting = “pay more/less attention to this word in the main prompt”
Use negatives for things to exclude. Use weighting to adjust emphasis among things you’re including. They compose well — a weighted main prompt plus a solid negative prompt is the standard professional setup.
One interaction to know: cranking the CFG scale (guidance strength) amplifies both the prompt and the negative prompt. If your negatives seem too aggressive, lowering CFG slightly softens them along with everything else.
Building Your Own Negative Prompt Library
As you develop, you’ll accumulate specialized negatives. Organize them:
- The universal base (the starter list above) — use on everything
- Portrait pack — anatomy terms, face terms
- Photorealism pack — style-contamination terms, artifact terms
- Scene pack — text terms, frame terms
- Style-specific — whatever your niche needs
Most interfaces let you save preset negative prompts or use textual-inversion embeddings trained specifically as negative prompts (these are small files that act as supercharged negatives — popular ones exist for anatomy and quality). The community has strong opinions about which are best; try the popular ones, keep what works for your style.
The meta-lesson: prompting is a two-handed skill. The main prompt is your right hand — creative, expressive, reaching for what you want. The negative prompt is your left hand — disciplined, protective, keeping you out of the ditches. Learn to use both, and your consistency will jump a level. It’s the same principle behind how Midjourney works with its own exclusion parameters — every serious image system gives you a way to say “not that.”
Negative Embeddings: The Upgrade Path
There’s a level beyond typing words into the negative box: negative embeddings. These are tiny trained files — a few kilobytes — that you drop into your embeddings folder and invoke by name in the negative prompt. Each one encodes a whole concept of “bad” that would take dozens of words to describe: bad anatomy, poor composition, ugly artifacts.
Why they beat word lists: an embedding was trained on actual examples of the failure mode, so it points at the bad region of image-space more precisely than your vocabulary can. A good bad-hands embedding outperforms a paragraph of hand-related terms — I tested this side by side on the same seed, and the difference was visible.
The community has produced several well-known ones; try the popular downloads, compare them against your word-list negatives, and keep whichever wins. One caution: embeddings are model-version specific. An embedding trained for SD 1.5 won’t behave on SDXL. And they’re a refinement, not a foundation — get your word-list negatives solid first, then let embeddings squeeze out the last few percent.

Frequently Asked Questions
Start with the universal list: “blurry, low-res, distorted, deformed, watermark, text, logo, oversaturated, grainy, out of frame.” Add anatomy terms (“extra fingers, mutated hands”) for portraits and text terms (“words, letters”) for scenes.
Yes, significantly — especially for anatomy and artifacts. The negative prompt actively steers generation away from bad regions at every denoising step. It’s not a post-filter; it’s guidance during generation, which is why the effect is so strong.
Yes, three ways: negating things you actually want (global effect), over-negation causing bland output, and the paradox where negating a concept (like a color) can increase it. Negate qualities and artifacts freely; negate content and style carefully.
“extra limbs, extra fingers, mutated hands, poorly drawn hands, fused fingers, too many fingers, malformed hands” is the standard set. Hands are the hardest anatomy for the model, so they deserve the most negative terms in portrait work.
Keep a universal base list for everything, then add specialized terms per image type — anatomy terms for portraits, text terms for scenes, style terms for photorealism. One static list for all images leaves quality on the table.
Keep reading: