How to Build a Simple AI Agent: A Beginner’s Walkthrough


The best way to understand AI agents is to build one. Not a framework, not a platform — a raw, minimal agent, maybe fifty lines of code, that takes an objective and works through it in a loop. You’ll learn more from that afternoon than from a month of reading architecture diagrams. I know because that’s how I learned: my first agent was embarrassingly simple, barely worked, and taught me everything.
This guide walks you through building a genuinely simple agent from scratch — the minimal loop, then the three upgrades that make it useful (tools, memory, guardrails), and the beginner mistakes to avoid. No framework required, just an LLM API key and Python. For the theory behind what you’re building, see what is an AI agent.
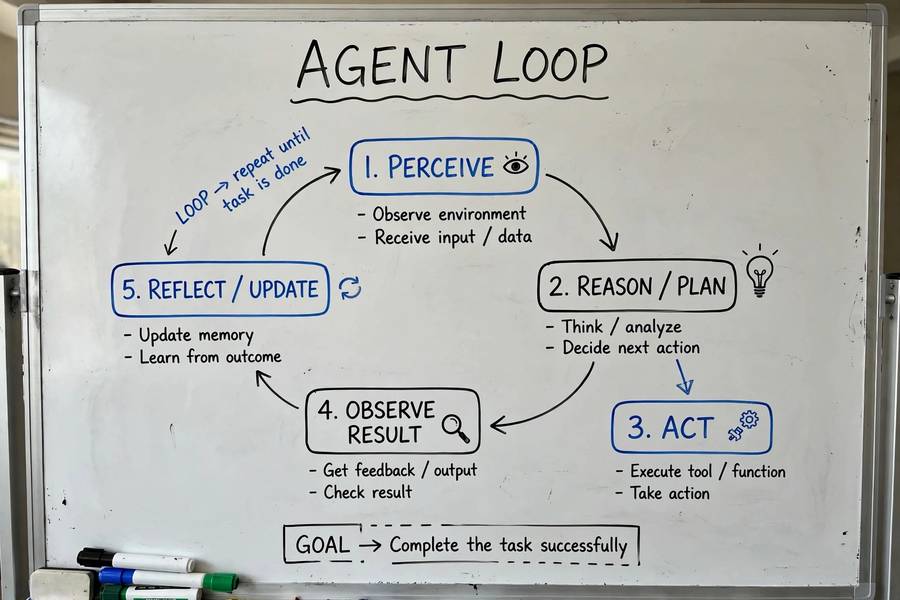
What You’ll Build
A “research assistant” agent: you give it a question, and it searches the web, reads results, and writes up an answer — looping until it’s satisfied or hits a step limit. It’s the “hello world” of agents: simple enough to understand fully, real enough to be genuinely useful.
By the end you’ll have touched every core component — the same building blocks behind the types of AI agents running in production today: the LLM reasoning, a tool, working memory, a control loop, and basic guardrails. The whole thing runs in a single Python file.
Prerequisites
- Python 3.9+ installed
- An LLM API key — any major provider works. You’ll make maybe 20–50 API calls testing this; budget a few dollars.
- A search API (for step 2) — many have free tiers sufficient for learning.
- Basic Python — functions, loops, dictionaries, JSON. If you can write a script that calls an API, you can build this.
- Terminal comfort — you’ll run it from the command line and read its output.
That’s it. No frameworks, no vector databases, no infrastructure. We’re building the thing frameworks abstract away, because understanding the abstraction requires seeing what’s underneath.
Step 1: The Minimal Loop (30 Lines)
The absolute simplest agent: a loop where the LLM decides the next action. Here’s the core idea in pseudocode that maps directly to real code:
def run_agent(objective, max_steps=10):
    history = [f"Objective: {objective}"]
    for step in range(max_steps):
        # Ask the model: what next?
        prompt = build_prompt(history)
        response = llm_call(prompt)
        history.append(f"Step {step}: {response}")
        # Check if done
        if "TASK COMPLETE" in response:
            return extract_answer(history)
    return "Max steps reached. Partial results: " + summarize(history)
The build_prompt function is where the magic lives. It constructs something like:
You are a research assistant. Your objective: {objective}.
History so far: {history}
Respond with either:
- Your next reasoning step and what you'll do
- "TASK COMPLETE" followed by your final answer when done
Run it. Give it “Research the history of electric vehicles and summarize key milestones.” Watch what happens: it’ll reason about the task in text — “I should search for early electric vehicles…” — but it can’t actually search. It’s a brain in a jar, thinking out loud. That’s the baseline: the loop works, but without tools it’s just a monologue.
What you learn: the agentic loop is just repeated LLM calls with growing history. Everything else is enhancement.
Step 2: Adding a Tool
Now give it hands. We’ll add web search using the function-calling pattern — in practice:
tools = [{
    "name": "web_search",
    "description": "Search the web for current information. Use for facts beyond training data.",
    "parameters": {
        "query": {"type": "string", "description": "Search query"},
        "max_results": {"type": "number", "description": "Results to return"}
    }
}]

def run_agent(objective, max_steps=10):
    history = [f"Objective: {objective}"]
    for step in range(max_steps):
        response = llm_call(build_prompt(history), tools=tools)
        if response.is_tool_call():
            result = execute_tool(response.tool_name, response.arguments)
            history.append(f"Tool {response.tool_name} returned: {result}")
        else:
            history.append(f"Agent: {response.text}")
            if "TASK COMPLETE" in response.text:
                return extract_answer(history)
    return summarize(history)
The execute_tool function is plain Python — it takes the search query, calls your search API, and returns formatted results. The model never touches the API directly; it just requests searches through structured calls.
Test it now. Same research objective. The difference is dramatic: the agent searches, reads results, searches again with refined queries, and synthesizes. It’s doing research — the loop plus one tool crossed the line from chatbot to agent.
What you learn: tools are just functions with descriptions. The model’s tool-use ability comes from understanding your descriptions — write them well.

Step 3: Adding Memory
Right now your agent forgets everything between runs. Let’s add the simplest useful memory: a notes file.
def load_memory():
    try:
        return open("agent_memory.txt").read()
    except FileNotFoundError:
        return "No prior memories."

def save_memory(notes):
    open("agent_memory.txt", "a").write(notes + "\n")

# In the loop, add to the prompt:
# "Your memories from previous tasks: {load_memory()}"
# And add a tool:
# {"name": "save_note", "description": "Save an important fact for future tasks.", ...}
Now tell it something (“I prefer concise bullet-point summaries”), have it save the note, and start a new task. It remembers. This is crude — production systems use vector databases — but it demonstrates the principle: memory is just persisted context the agent can read and write.
The lesson that matters: memory makes agents feel intelligent across sessions, but it’s also where staleness and poisoning live. Even in this toy, consider: what if a malicious webpage told your agent to save a false “memory”? You’re already thinking about agent security. Good.
Step 4: Adding Guardrails
Your agent currently runs until it says it’s done or hits the step limit. Let’s add the minimal safety layer:
MAX_STEPS = 15           # Hard stop on loop iterations
MAX_TOOL_CALLS = 30      # Budget on tool usage
BLOCKED_DOMAINS = [...]  # Never fetch from these

# Before executing any tool:
def execute_tool_safe(name, args):
    if tool_call_count >= MAX_TOOL_CALLS:
        return "ERROR: tool budget exhausted, wrap up."
    if name == "web_search" and any(d in args["query"] for d in BLOCKED):
        return "ERROR: blocked query."
    log_tool_call(name, args)  # Audit everything
    return execute_tool(name, args)
Also add: a cost tracker (count tokens, estimate spend per run), a confirmation gate template for any future write-actions, and logging of every decision. These five additions — step limits, tool budgets, blocklists, audit logging, cost tracking — are the seed of production agent safety.
What you learn: guardrails aren’t a separate system bolted on later. They’re part of the loop from the start, or they’re not really there.
Understanding What You Built
Congratulations — you have a real agent. Let’s map it to the architecture:
- LLM: your API calls — the reasoning engine
- Tool: web_search (and save_note) — the action layer
- Memory: history list (working) + notes file (episodic) — the memory system
- Control loop: your for-loop with the done-detection — the planner
- Guardrails: step limits, budgets, logging — the safety layer
It’s missing a lot — no planning decomposition, no error recovery, no vector memory, no evaluation. But the shape is right. Every framework you’ve heard of (LangChain, CrewAI, AutoGen) is this loop with better tooling, more patterns, and production hardening. You now understand what they’re abstracting.
Try breaking it deliberately: give it an impossible objective and watch the loop behavior. Give it a vague objective and see what it assumes. These experiments teach more than any documentation.
Beginner Mistakes (All of Which I Made)
No step limit. My first agent ran 200 iterations on a simple question, burning $8, because I forgot the max_steps check. Always bound the loop.
Vague tool descriptions. “Searches stuff” produces creative misuses. Write descriptions like the model is a smart intern who’s never seen your systems — because functionally, it is.
Ignoring tool errors. My early execute_tool crashed on API failures, killing the whole run. Catch exceptions, return informative error messages as tool results, and let the model recover. Error messages are the model’s only feedback — make them good.
History bloat. Appending full tool outputs unfiltered, the context grew until the model got confused and slow. Summarize or truncate tool results; keep history lean.
Testing only the happy path. It worked on my test question! Then a real user asked something ambiguous and it confidently researched the wrong thing for 15 steps. Test with vague, adversarial, and weird inputs early.
No cost tracking. “It’s just a few API calls” — until you leave it running overnight. Track tokens and spend from day one. Future you will be grateful.
Skipping the done-detection. Without a clear completion signal, agents either stop too early (“I found one source, done!”) or never stop. Define what “done” looks like in the prompt, and verify it in testing.
Where to Go Next
Add a second tool. A calculator, a file reader, a second search source. Feel the tool-selection dynamics change.
Try a framework. Now that you understand the loop, LangChain or CrewAI will make sense — you’ll recognize every abstraction.
Build the eval. Write 10 test tasks with expected outcomes. Run your agent on all 10 after every change. You’ve just built your first eval harness.
Read about failure modes. Prompt injection, compounding errors, memory poisoning — understanding these now, while your agent is simple, builds instincts that scale.
Join the community. The agent-building community builds in public — GitHub, Discord servers, Twitter/X. The field moves fast; learning in public keeps you current.
The most important next step, though: use your agent for real tasks. Nothing teaches like production pressure. Give it your actual research questions, watch where it struggles, and improve exactly those parts. That’s how every good agent gets built — not from architecture diagrams, but from the loop of use, failure, and fix.

Frequently Asked Questions
An afternoon. The minimal loop is ~30 lines of Python; adding a tool, basic memory, and guardrails brings it to ~150 lines. You’ll learn more from that afternoon than from weeks of reading — building the raw loop teaches what frameworks abstract away.
No — and for learning, you shouldn’t use one. A simple agent is just a loop of LLM calls with tools and growing history, buildable in raw Python with an LLM API key. Learn the loop first; frameworks (LangChain, CrewAI) make sense afterward, when you recognize every abstraction.
Python, by a wide margin — every major framework, most examples, and the richest tooling ecosystem. JavaScript/TypeScript is second choice for web-integrated agents. The language matters less than understanding the loop, tools, and memory patterns.
A few dollars for learning — maybe 20–50 API calls during development and testing. Track tokens from day one; costs scale with loop iterations and model choice. A 20-step task on a frontier model can cost dollars per run, which is why step limits and cost tracking belong in v1.
No step limit and no cost tracking — agents in unbounded loops run up costs fast. Close behind: vague tool descriptions (models misuse what they don’t understand), ignoring tool errors (crashes kill runs instead of teaching recovery), and testing only the happy path.