How to Adjust a Sprinkler Head for Even Lawn Coverage


Brown spots in an otherwise green lawn are almost always a sprinkler problem, not a grass problem. Learning how to adjust a sprinkler head takes about five minutes per head and can be the difference between an even, healthy lawn and a patchwork of dry zones and puddles. The exact steps depend on which type of head you have, pop-up spray heads, gear-driven rotors, or old-school impact sprinklers, so this guide covers all three.
First: Identify Your Sprinkler Head Type
Pop-up spray heads rise a few inches when the zone runs and spray a fixed fan of water. They cover smaller areas, up to about 15 feet, and are adjusted with a small flathead screwdriver. Rotor heads (brands like Hunter PGP and Rain Bird 5000 are the common ones) pop up and sweep back and forth, covering 20 to 50 feet; they adjust with a special key or tool, though a hex key sometimes works. Impact sprinklers are the classic clicking brass heads on spikes or risers, adjusted by moving deflector tabs and a trip lever. Walk your zones while they run and note which type is where.
How to Adjust a Pop-Up Spray Head
Step 1: Adjust the direction. With the zone running (or the head pulled up by hand when off), grip the stem and rotate it so the spray points at the area you want to water. Most spray nozzles rotate freely on the stem.
Step 2: Set the arc. Look for the small screw or slot on top of the nozzle. Turning it changes the spray pattern’s arc, typically adjustable from a narrow strip up to a full 360 degrees. Some nozzles have a fixed pattern (quarter, half, full) printed on top; if the pattern is wrong for the location, just swap the nozzle, they unscrew by hand and cost a few dollars.
Step 3: Set the radius. The same top screw usually controls distance too: tightening it reduces the throw, loosening increases it. Aim for head-to-head coverage, meaning each head’s spray should just reach the next head. That’s the golden rule of even watering.
Step 4: Check for tilt. Heads that lean after mowing or foot traffic spray into the dirt on one side. Dig around the head slightly and straighten it so it sits level.
How to Adjust a Rotor Head
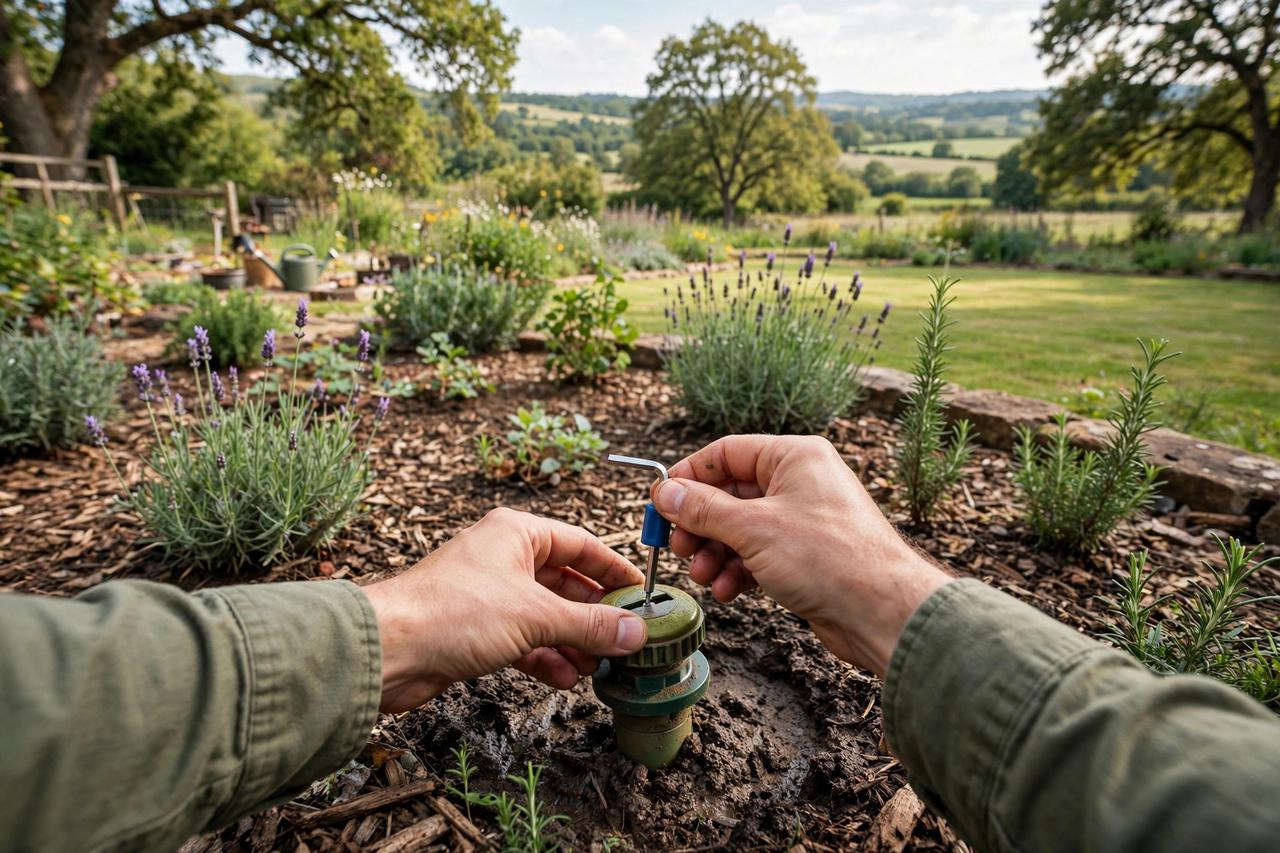
Rotor heads need their arc set so they sweep exactly the area you want, no more, no less. With the zone running, insert the adjustment key (or the correct hex key) into the arc-adjustment slot on top of the head.
Step 1: Find the fixed side. Every rotor has one side of its arc that doesn’t move. Rotate the turret by hand to find it; you’ll feel it stop. Align that fixed side with the left edge of the area to water.
Step 2: Set the arc. Turn the key in the direction indicated on the head (usually marked with plus and minus) to widen or narrow the sweep. Most rotors adjust from about 40 degrees up to 360. Count your turns so you can fine-tune.
Step 3: Set the radius. A separate screw on most rotors adjusts throw distance, typically by up to 25%. Tighten to pull the stream back from a sidewalk or fence; loosen to reach farther.
Fine-tuning tip: after setting the arc, watch a full sweep cycle before moving on. Rotor heads sometimes creep a few degrees over the first cycles as the mechanism settles, and catching that drift now beats re-adjusting later. If two adjacent heads overlap too much in the middle, reduce both radii slightly rather than narrowing the arcs; you want even overlap, not gaps. Mark your final settings with a paint pen on the head’s top so next season’s check takes seconds.
Step 4: Check the rotation direction. If the head is sweeping the wrong area entirely, you set the arc from the wrong side. Reset it to minimum, re-find the fixed side, and start over. It happens to everyone.
How to Adjust an Impact Sprinkler
Impact heads are refreshingly mechanical. The trip pin and the two collar tabs control everything. To change the arc, loosen the collars and slide the tabs: the distance between them sets how far the head rotates before reversing. The small deflector tab that the stream hits controls distance; flipping it into the stream shortens the throw, flipping it out lengthens it. For a full circle, flip the trip lever up so it never engages.
The Coverage Check: The Step Everyone Skips
After adjusting, run each zone and walk it with a critical eye. Look for dry spots between heads (increase radius or fix arc), water hitting sidewalks and driveways (pull back radius or narrow the arc), and misting (which means pressure is too high; a pressure-regulating head or a partially closed valve fixes it). Place a few empty tuna cans around the zone and run it for 15 minutes; cans with wildly different water levels reveal uneven coverage. This one test tells you more than any amount of eyeballing.
A well-tuned system also saves water and money. Heads spraying the driveway aren’t just wasteful; they’re often a sign the whole zone needs ten minutes of attention. While you’re out there with tools in hand, it’s worth having the right gear for the job; our roundup of garden tools every beginner needs covers the basics that make yard work like this much easier.
Troubleshooting Common Sprinkler Head Problems
Head won’t pop up: usually dirt in the mechanism or low pressure. Unscrew the head, flush the line by running the zone briefly, rinse the head, and reinstall. Head sprays weakly on one side: the nozzle is partially clogged; unscrew it and rinse the filter screen underneath. Water gushing from the base: the seal is shot or the head is cracked; replace the head, they’re inexpensive and swap in minutes. One zone weaker than others: could be a partially closed valve or a leak in that zone’s line, worth investigating before you blame the heads.
Seasonal Sprinkler Maintenance in Five Minutes
Adjustment isn’t a one-time job; heads drift out of alignment constantly. Build a quick seasonal routine and you’ll rarely have brown spots again. In spring, walk every zone as it starts up: straighten tilted heads, clear grass that’s grown over nozzles, replace cracked heads from winter, and re-check arcs after any landscaping changes. Mid-summer, do the tuna-can test on any zone that looks uneven; heat stress reveals coverage gaps that spring rain was hiding.
In fall, the job shifts to winterization if you’re in a freezing climate: shut off the water to the system, drain the lines (blow-out with compressed air is the thorough method, done carefully at low pressure), and insulate any above-ground backflow preventer. Skipping winterization is how pipes split and heads crack, turning a five-minute spring check into a weekend of repairs. Even in warm climates, fall is the right time to cut watering schedules back as growth slows; overwatering in cool weather invites fungus.
Watering Smarter: Schedules Matter as Much as Heads
Perfectly adjusted heads still waste water on a bad schedule. The fundamentals: water deeply and infrequently, not a little every day. Deep watering trains roots downward; daily sprinkles keep them shallow and fragile. Most lawns need about an inch of water per week, including rainfall, which usually means one or two long sessions rather than seven short ones. The tuna-can test doubles as a calibration tool: time how long it takes your zone to put half an inch in the cans, and that’s your runtime.
Water early in the morning, ideally finishing before sunrise. Midday watering loses huge amounts to evaporation; evening watering leaves grass wet overnight, inviting fungus. Adjust for the season: spring and fall need far less than summer heat, and many controllers have a seasonal-adjust percentage that scales every zone at once. Skip watering after real rain; a rain sensor, a cheap add-on, automates this. And watch your lawn, not the calendar: grass that stays springy underfoot has enough water, while footprints that linger signal thirst. The best irrigation system is adjusted heads plus an observant owner.
Sprinkler adjustment is a ten-minute skill that pays off every time you look at your lawn. Identify the head type, set the arc and radius with the zone running, aim for head-to-head coverage, and verify with the tuna-can test. Check alignment a couple of times a season, because mowers and feet undo your work constantly. Pair tuned heads with a sensible watering schedule, deep and infrequent, early in the morning, and you’ll use less water while growing healthier grass. Brown spots are rarely a grass problem. They’re an adjustment problem, and now you know how to fix them.
Frequently Asked Questions: How to Adjust a Sprinkler Head
How do I know what type of sprinkler head I have?
Pop-up spray heads rise a few inches and spray a fixed fan; rotor heads pop up and sweep back and forth over long distances; impact heads are the classic clicking brass sprinklers. The adjustment method is different for each.
What is head-to-head coverage?
It’s the rule that each sprinkler’s spray should reach the next sprinkler head. This overlap is what produces even watering; without it you get dry spots between heads.
Why is my sprinkler spraying the sidewalk?
The arc or radius is set too wide. Tighten the radius screw to shorten the throw, or narrow the arc so the sweep stays on the grass. If the head itself is misaligned, rotate the stem.
Can I adjust sprinkler heads while the water is off?
Yes for arc and direction on most heads; you can pull a pop-up stem up by hand. But radius and coverage are much easier to dial in with the zone running so you can see the result.
How often should I check my sprinkler heads?
At least twice a season, plus after any lawn work near the heads. Mowers, edgers, and foot traffic knock heads out of alignment constantly.
What causes a sprinkler head to mist instead of spray?
Misting almost always means excessive pressure at the head. Install a pressure-regulating head or stem, or throttle the zone valve slightly. Misting wastes water to evaporation and gives poor coverage, so it’s worth fixing.