
The bent over row is one of the best back exercises ever invented — and one of the most butchered. Walk into any gym and you’ll see it: people standing nearly upright, heaving the bar with their entire body, wondering why their back never grows and their lower back always aches.
Done right, the bent over row builds the entire back — lats, rhomboids, traps, rear delts — while teaching the hip hinge that protects your spine in daily life. Done wrong, it’s an ego lift that trains your lower back pain instead of your lats.
Here’s how to do it right, whether you’re using a barbell or dumbbells.
Table of Contents
- Why the Bent Over Row Matters
- Barbell Bent Over Row: Step-by-Step Form
- Dumbbell Bent Over Row Technique
- The Hip Hinge: The Foundation
- Grip Options: Overhand vs. Underhand
- Common Mistakes (and Fixes)
- Best Variations
- Programming: Sets, Reps, and Frequency
- Frequently Asked Questions
Why the Bent Over Row Matters
Your back is half your upper body, and most people barely train it. We push all day — doors, strollers, ourselves off the couch — but pulling is rare in modern life. The result: rounded shoulders, weak posture, and aching necks.
The bent over row fixes this directly. It’s a compound pulling movement that loads the entire posterior chain isometrically (your lower back, glutes, and hamstrings work hard just holding position) while the lats and upper back do the dynamic work. Few exercises give you this much return per rep.
It’s also the perfect complement to pressing. For every push-up or bench press, you should be rowing — balanced pushing and pulling is what keeps shoulders healthy for decades. If you’re doing push-ups correctly, rows are their mandatory partner.
Barbell Bent Over Row: Step-by-Step Form
Setup:
1. Stand with feet hip-width apart, barbell over your mid-foot.
2. Hinge at the hips and bend your knees slightly, gripping the bar just outside your knees.
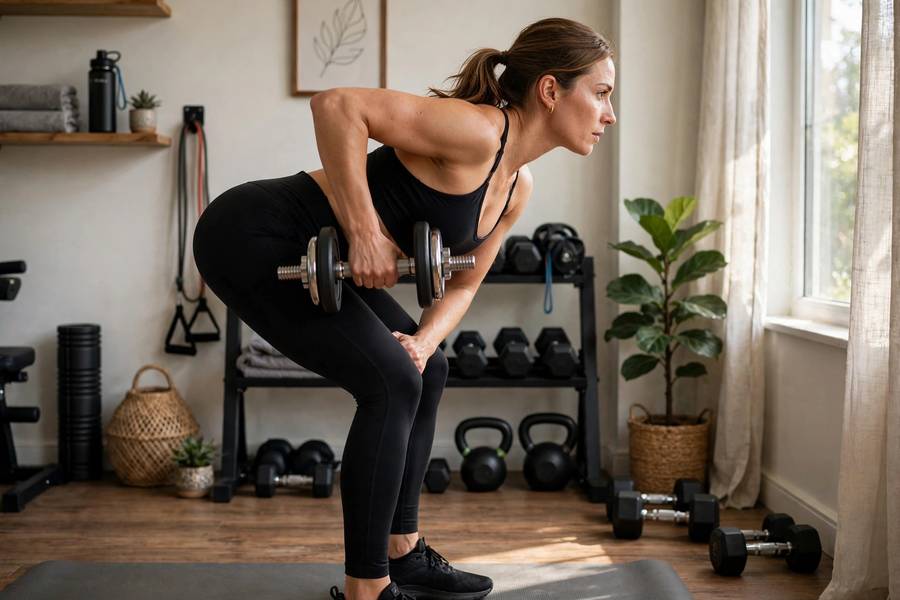
3. Flatten your back — think “chest proud, back flat.” Your torso should be roughly 30–45 degrees above parallel to the floor.
4. Brace your core like someone’s about to punch your stomach.
The rep:
1. Pull the bar toward your lower chest/upper abdomen, driving your elbows behind you.
2. Squeeze your shoulder blades together hard at the top — one full second.
3. Lower under control until your arms are fully extended. Don’t just drop it.
4. Keep your torso angle constant. Your hips shouldn’t rise as you pull.
Breathing: exhale on the pull, inhale on the lower. Brace hard before each rep.
The weight should challenge your back, not your ability to stay bent over. If your form collapses, the weight is too heavy — full stop.
Dumbbell Bent Over Row Technique
The dumbbell version follows the same principles with two advantages: greater range of motion and independent arm work.
Hinge over with a dumbbell in each hand, palms facing each other (neutral grip) or facing behind you. Row both weights to your torso simultaneously, or alternate arms. The alternating version lets you focus on each side and gives a slight rest between reps — great for learning.
Dumbbell rows are ideal for building muscle at home since they need minimal space and equipment. A pair of adjustable dumbbells and six feet of floor is a complete back gym.
The Hip Hinge: The Foundation
Everything about the row depends on the hinge. If you can’t hip-hinge properly, you can’t row safely. Here’s the test: stand a foot from a wall, facing away, and push your hips back until they touch the wall — without your knees traveling far forward. That’s the hinge.
In the row, the hinge does two jobs: it puts your torso in position to pull, and it loads your glutes and hamstrings to support your spine. Your lower back should feel worked from holding position (isometric), but never sharp or painful. Dull muscular fatigue = good. Sharp pain = stop immediately and check form.
If hinging is new to you, practice with a broomstick along your spine (touching head, upper back, and tailbone) before adding weight.

Grip Options: Overhand vs. Underhand
Overhand (pronated) grip — palms facing you as you hinge. The standard. Emphasizes the upper back, lats, and rear delts evenly. Start here.
Underhand (supinated) grip — palms facing away. Shifts emphasis to the lats and biceps, similar to a chin-up pattern. Many people feel their lats better this way. Slightly more bicep involvement means you might row a touch more weight.
Width: just outside the knees for barbell. Too wide becomes a rear-delt exercise; too narrow cramps the movement. Experiment within that range to find what hits your back best.
Common Mistakes (and Fixes)
Standing too upright. If your torso is at 70 degrees, you’re doing an upright row with extra steps. Get bent over — 30–45 degrees. Film yourself from the side; you’ll be shocked.
Jerking the weight up. Momentum means your back isn’t doing the work. If you have to heave, drop the weight 20% and own every rep.
Rounding the lower back. The most dangerous mistake. If you can’t keep your back flat, the weight is too heavy or your hamstrings are too tight to hinge properly. Fix the cause, not the symptom.
Pulling to the chest instead of the abdomen. Pulling high shifts work to the upper traps. Pull to the lower ribs/upper abs for lat emphasis.
No squeeze at the top. Touch-and-go reps waste half the benefit. That one-second squeeze is where the growth happens.
Neck craning. Keep your neck neutral — look at the floor a few feet ahead, not at the mirror. Craning your neck up for the whole set is a fast track to neck pain.
Best Variations
Once the basic row is solid, these add variety:
- Pendlay rows: bar starts from the floor each rep, torso parallel to ground. Explosive, strict, humbling. Advanced.
- Chest-supported rows: lying face-down on an incline bench. Removes all momentum and lower-back stress — pure back work.
- Single-arm dumbbell rows: one knee on a bench. Maximum focus per side, great for fixing imbalances.
- Seal rows: lying on a raised flat bench, rowing from a dead hang. The strictest row variation that exists.
- Inverted rows: hanging under a bar, pulling your chest up. A perfect bodyweight exercise alternative when you have no weights.
Programming: Sets, Reps, and Frequency
For strength: 4–5 sets of 5–8 reps, heavy, full rest between sets.
For muscle growth: 3–4 sets of 8–12 reps, controlled tempo, 60–90 seconds rest.
For beginners: 3 sets of 8–10 reps, twice a week, focusing purely on form.
Rows fit on pull days, back days, or full-body sessions. Most people do well rowing twice weekly — the back recovers quickly and responds to frequency. Always row at least as much as you press; ideally more.
Progress by adding small amounts of weight when you can complete all reps with clean form. The row rewards patience — sloppy heavy rows build nothing but problems.
Warming Up Before Rows
Rows demand a lot from your lower back and shoulders — don’t start cold:
- Cat-cow × 10 — mobilizes the spine gently
- Band pull-aparts × 15 — wakes up the upper back and rear delts
- Light dumbbell rows × 12 per arm — rehearses the pattern
- Hip hinge practice × 10 — broomstick along the spine, groove the position
Then one light warm-up set of your working row variation. Two minutes of preparation prevents the tweaked back that costs you two weeks.
Frequently Asked Questions
Roughly 30–45 degrees above parallel is the sweet spot for most people. Perfectly parallel (Pendlay style) is an advanced variation. More upright than 45 degrees turns it into a different exercise.
Your lower back works isometrically to hold position, which strengthens it — but it shouldn’t be the limiting factor or feel strained. If your lower back gives out before your lats, the weight is too heavy or your hinge needs work.
Both are excellent. Barbells allow heavier loading; dumbbells allow greater range of motion and fix imbalances. If you can only pick one, dumbbells are more versatile for most home and gym situations.
You’re pulling with your arms instead of driving your elbows back. Think “elbows to the ceiling behind you” and squeeze your shoulder blades. Dropping the weight 10–20% usually fixes the mind-muscle connection immediately.
As heavy as you can while keeping your torso angle constant and back flat. If your form breaks down, it’s too heavy — regardless of what the number says. Most people row far less than they think they “should,” and that’s fine.
Yes, with light weight and attention to the hip hinge. Beginners might start with chest-supported or single-arm dumbbell rows, which are more forgiving while you learn the movement pattern.