
Mountain climbers look simple. Get in a plank, drive your knees toward your chest, go fast. And yet I’d estimate that 80% of the people I see doing them in gyms are doing them wrong — bouncing their hips up and down, barely moving their knees, and getting about a quarter of the benefit while doubling the joint stress.
Here’s the thing: mountain climbers are one of the best bodyweight exercises in existence when done right. They hammer your core, spike your heart rate, work your shoulders and hip flexors, and require zero equipment and about six feet of floor space. They’re a cardio workout and a core workout in one movement. But “done right” is doing a lot of heavy lifting in that sentence.
I’ve programmed mountain climbers for everyone from deconditioned beginners to competitive athletes. The movement scales beautifully — but only if the foundation is solid. So let’s build it properly, step by step.
Table of Contents
- What Muscles Do Mountain Climbers Work?
- The Starting Position: Your Plank Is Everything
- Step-by-Step: How to Do Mountain Climbers
- How Fast Should You Go?
- The 5 Mistakes Everyone Makes
- Beginner Modifications
- Variations to Level Up
- How to Program Mountain Climbers
- Frequently Asked Questions
What Muscles Do Mountain Climbers Work?
More than you’d think from a “core exercise”:
- Core (rectus abdominis, obliques, transverse abdominis): The primary target. Your entire midsection works to stabilize your body while your legs move.
- Hip flexors: Driving the knee forward is pure hip flexor work — an area most desk workers desperately need to strengthen.
- Shoulders and chest: Holding the plank position loads your upper body isometrically the entire time.
- Quads and glutes: Stabilizing and driving, especially in slower, controlled variations.
- Cardiovascular system: Done at pace, mountain climbers are legitimate cardio. Your heart rate climbs fast.
This is why I love them for busy people: one exercise, multiple systems, no equipment. If you only have ten minutes, a mountain climber circuit is one of the highest-return things you can do.
The Starting Position: Your Plank Is Everything
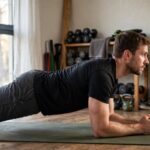
Every mountain climber rep starts from a plank, and a bad plank means bad mountain climbers. Before you move a single knee, lock this in:
- Hands directly under your shoulders, fingers spread, pressing the floor away.
- Body in a straight line from head to heels — no sagging hips, no pike in the air.
- Core braced like someone’s about to poke your stomach. Glutes squeezed.
- Head neutral — look at the floor slightly ahead of your hands, not craning up at the mirror.
- Feet together or slightly apart, weight on your toes.
Hold this for 10 seconds. Feel every muscle working? Good. If you can’t hold a solid plank, you’re not ready for mountain climbers yet — and that’s completely fine. Build your plank first with my guide on how to do a plank correctly, then come back. The mountain climbers will still be here, and they’ll be ten times more effective.
Step-by-Step: How to Do Mountain Climbers
From your solid plank position:
Step 1: Brace your core hard. Everything starts from tension.
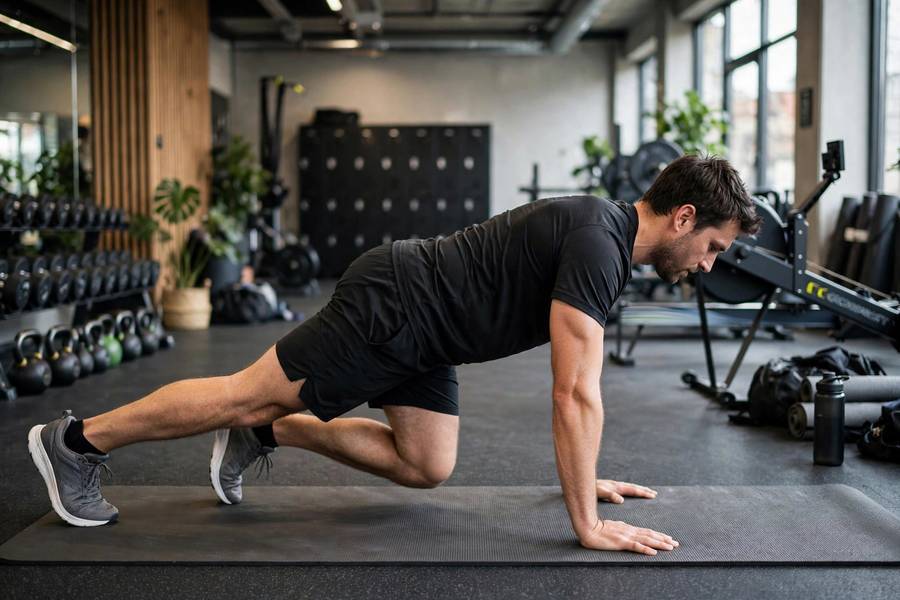
Step 2: Drive your right knee toward your chest. Bring it as far forward as you can — aim to get the knee under your chest, not just a little shuffle forward. Your foot can hover off the ground; it doesn’t need to touch.
Step 3: As you return the right leg back to the starting plank position, simultaneously drive the left knee forward. The legs switch in the air — one comes back as the other comes through. Think of it as a smooth exchange, not two separate movements.
Step 4: Continue alternating. Right, left, right, left — each knee driving toward the chest, hips staying level the entire time.
Step 5: Breathe. Exhale as you drive each knee in, or just keep a steady rhythmic breath. Don’t hold your breath — I see this constantly, and it turns a 30-second set into a gasping mess.
That’s the whole movement. Simple on paper. The devil is in the details, which brings us to the mistakes.
How Fast Should You Go?
This is where opinions split, so here’s my honest take from coaching both ends of the spectrum:
Slow and controlled (my recommendation for most people): Each knee drive takes about one second. Full range of motion, hips dead level, core screaming. This builds the most strength and teaches the best movement pattern. If you’re doing these for core development, go slow.
Fast and explosive (for conditioning): Rapid knee drives, almost like sprinting in place in a plank. This is a cardio and conditioning tool — great for HIIT circuits, fat-burning finishers, and athletic conditioning. But — and this is critical — speed is a privilege you earn with control. If your form falls apart at speed, you’re going too fast.
The test I use with clients: can you pause at any point mid-set and hold a perfect plank? If yes, your speed is fine. If pausing would collapse you into a heap, slow down.
For most beginners, I program mountain climbers as timed sets: 20-30 seconds of controlled reps, rest, repeat. Counting reps gets messy when people rush; time keeps everyone honest.

The 5 Mistakes Everyone Makes
Watch any gym floor for ten minutes and you’ll see all of these:
1. Bouncing the hips. The hips pop up toward the ceiling with every knee drive, turning the movement into a weird hopping motion. Your hips should stay level — imagine balancing a glass of water on your lower back. If it would spill, you’re bouncing.
2. Short, lazy knee drives. The knee comes forward about six inches and goes back. That’s not a mountain climber, that’s fidgeting. Drive the knee all the way toward your chest. Full range or don’t bother.
3. Sagging lower back. As fatigue sets in, the hips drop and the lower back arches. This dumps all the stress into your lumbar spine — exactly what we’re trying to avoid. When your back starts sagging, the set is over. Rest and go again.
4. Hands drifting forward. Your hands creep out in front of your shoulders, turning the plank into a stretched-out, weak position. Check your hand placement every few sets. Hands under shoulders, always.
5. Holding your breath. People brace so hard they forget to breathe, then gasp and quit early. Brace your core, yes — but keep air moving. Rhythmic breathing, in through the nose, out through the mouth.
Fix these five and you’re already doing better mountain climbers than most of the fitness influencers filming them.
Beginner Modifications
Not ready for full mountain climbers? No problem. Here’s the progression ladder — start where you are, not where you wish you were:
Level 1: Elevated mountain climbers. Put your hands on a sturdy bench, box, or step instead of the floor. The incline makes the plank easier while you learn the knee-drive pattern. This is where most true beginners should start.
Level 2: Slow alternating knee drives. On the floor, but slow — take a full two seconds per knee drive. Pause briefly with the knee at your chest. Build control before speed.
Level 3: Standard mountain climbers. Full movement, controlled tempo, 20-30 second sets.
Level 4: Fast mountain climbers. Now you earn the speed.
Spend at least a week or two at each level. Rushing the progression is how people end up with the bouncing-hip mess I described above. The movement you build slowly is the movement that sticks.
If even elevated mountain climbers are too much, go back to planks and bodyweight exercises you can do anywhere to build the base. There’s no shame in the progression — the only shame is in sloppy reps.
Variations to Level Up
Once standard mountain climbers feel solid:
Cross-body mountain climbers. Drive each knee toward the opposite elbow. Hammers the obliques and rotational core strength.
Wide mountain climbers. Drive each knee toward the same-side elbow, outside the body. Opens the hips, hits the outer core differently.
Spiderman mountain climbers. Slow wide version — knee touches elbow, pause a beat. Brutal on core and hip mobility.
Elevated-feet mountain climbers. Feet on a bench, hands on the floor. Shifts load to shoulders and upper core. Only when standard form is bulletproof.
Pick one variation and run it 3-4 weeks before switching. Depth beats novelty.
How to Program Mountain Climbers
How you use mountain climbers depends on your goal:
For core strength: 3-4 sets of 30-45 seconds, slow and controlled, 60 seconds rest. Treat them like a strength exercise — quality over quantity.
For conditioning/HIIT: 20-30 seconds all-out, 10-20 seconds rest, repeat 6-8 rounds (Tabata-style). Or work them into a circuit: 30 seconds mountain climbers, 30 seconds push-ups, 30 seconds squats, rest one minute, repeat 3-4 rounds.
As a warm-up: 2 sets of 20 seconds at moderate pace before your workout. They activate the core, hips, and shoulders — everything you need switched on.
As a finisher: End your workout with 3 rounds of 30 seconds on, 30 seconds off. You’ll know you worked.
Pair them with complementary movements for a balanced session. Mountain climbers plus how to do push-ups with perfect form plus squats is a complete full-body workout with zero equipment. That’s not a compromise workout — that’s a legitimately good training session.

Frequently Asked Questions
For beginners, 3 sets of 20-30 seconds with good form beats any rep target. As you improve, work up to 3-4 sets of 45-60 seconds. For conditioning workouts, try 20 seconds on and 10 seconds off for 8 rounds. Quality always matters more than quantity — stop the set when your hips start sagging or bouncing.
Mountain climbers burn calories and build core muscle, both of which help with overall fat loss — but no exercise burns fat from one specific spot. Belly fat comes off through a sustained calorie deficit combined with training. Mountain climbers are an excellent piece of that puzzle because they combine core work with serious calorie burn, but they’re not a shortcut around nutrition.
Slow and controlled for core strength; fast for cardio conditioning. Most people should master the slow version first — full knee drive, level hips, 1 second per rep — before adding speed. Fast reps with bad form just reinforce bad movement patterns. Earn the speed with control first.
Wrist pain usually comes from dumping all your weight into your palms with bent-back wrists. Spread your fingers wide, grip the floor actively, and keep your weight distributed across your whole hand rather than the heel of the palm. If pain persists, try elevated mountain climbers on a bench to reduce the wrist angle, or do them on your fists on a mat.
Yes, with modifications. Start with elevated mountain climbers — hands on a bench or sturdy step — which reduces the load while you learn the movement. Once you can hold a solid 30-second plank and do 20 controlled elevated reps, progress to the floor version. There’s no rush; the progression exists so everyone can start safely.
For most people, yes. Mountain climbers train the entire core — including the deep stabilizers — while also working shoulders, hip flexors, and your cardiovascular system. Crunches isolate one small part of the abs through a tiny range of motion. If you have limited training time, mountain climbers give you far more return per minute than crunches ever will.